Kladblok voor wat ik wil terug kunnen vinden
00-B3-F6-00-36-1F Bifferboard Mac Address
![]()
darkice
using /etc/darkice.cfg
input device /dev/dsp
![]()
icecast2 -b -c /etc/icecast2/icecast.xml
/logs/error.log
/logs/access/log
als root: chmod 777 logs![]()
darkice can't open connector betekent volgens mij gewoon dat je het verkeerde (een niet bestaand) audio device hebt opgegeven.
ls /dev/dsp* en ls/dev/audio*
![]()
lighttpd.conf het poortnummer instellen en de root directory op /var/www
cd /etc/default nano icecast2 dan enable init.d activeren om hem met /etc/init.d/icecast2 weer te kunnen starten![]()
apt-get = bifferboard package manager
apt-get upgrade doet een upgrade van geïnstalleerde pakketten.
apt-cache search naam zoekt of een pakket beschikbaar is voor apt-get install
dpkg -l geeft overzicht geïnstalleerde pakketten
To see if a package is installed: dpkg -l |grep package
top = processorload vanaf commandline
df = diskfree met overzicht van gemounte devices en hun grootte
sudo nautilus in Ubuntu opent bestandsbeheer als root. Dit heb je nodig om bijvoorbeeld het rootfs op een USB stick te mogen schrijven
apt-get install libhamlib2 voor rigctl en daarna ook de libhamlib-utils![]()
Netwerk configuratie Debian Lenny d.m.v. het bestand interfaces in /etc/network,
netwerk herstarten met /etc/init.d/networking restart
# The loopback network interface
auto lo
iface lo inet loopback
#Voor DHCP adres
# auto eth0
# iface eth0 inet dhcp
#Voor fixed IP address
auto eth0
allow-hotplug eth0
iface eth0 inet static
address 192.168.0.XX
netmask 255.255.0.0
broadcast 192.168.0.255
gateway 192.168.0.1
dns-domain lan
dns-nameservers 192.168.0.1![]()
apt-get install libhamlib2
apt-get install libhamlib-utils
apt-get install samba
apt-get install lighttpd
var/www/cgi-bin is een link naar /usr/lib/cgi-bin
In /etc/lighttpd/lighttpd.conf bij de server modules "mod-cgi" toevoegen
en vertellen wat er met cgi of perl bestanden moet gebeuren onder
#### handle Debian Policy Manual, Section 11.5. urls
## by default allow them only from localhost
cgi.assign = ( ".pl" => "/usr/bin/perl",
".cgi" => "/usr/bin/perl" )
lighttpd herstarten met /etc/init.d/lighttpd restart![]()
Om via de webserver data te kunnen schrijven naar de rs-232 / USB convertor:
create a file named /etc/udev/rules.d/rig.rules with the following content:
KERNEL=="ttyUSB0", GROUP="dialout", MODE="666"
Daarna zou ttyUSB0 de juiste rechteninstelling moeten kennen:
bifferboard:~# ls -l /dev/ttyUSB0
crw-rw-rw- 1 root dialout 188, 0 2009-08-07 04:03 /dev/ttyUSB0![]()
Samba configuratie:
#### Networking ####
# The specific set of interfaces / networks to bind to
# This can be either the interface name or an IP address/netmask;
# interface names are normally preferred
interfaces = 127.0.0.0/8 eth0
#======================= Share Definitions =======================
[homes]
comment = Home Directories
browseable = yes
# By default, the home directories are exported read-only. Change the
# next parameter to 'no' if you want to be able to write to them.
read only = no
# File creation mask is set to 0700 for security reasons. If you want to
# create files with group=rw permissions, set next parameter to 0775.
create mask = 0770
# Directory creation mask is set to 0700 for security reasons. If you want to
# create dirs. with group=rw permissions, set next parameter to 0775.
directory mask = 0770
# By default, \\server\username shares can be connected to by anyone
# with access to the samba server.
# The following parameter makes sure that only "username" can connect
# to \\server\username
# This might need tweaking when using external authentication schemes
valid users = root
[allfiles]
path = /
browseable = yes
writeable = yes
valid users = root
admin users = root![]()
Simpele smb.conf die anonieme toegang toestaat en ook write rechten heeft (toepassen op eigen risico !)
interfaces = lo eth0
bind interfaces only = true
security = share
guest account = nobody
[allfiles]
path = /
browseable = yes
read only = no
force user = root
guest ok = yes![]()
En toen heb ik de USB stick vervangen door een USB naar IDE kabel met daaraan een 1,8 Inch IDE naar CF adapter met daarin een 8 GB CF kaartje.
Alle bestanden van het ROOTFS van de SUB stick gecopieerd onder linux naar een map en daarvandaan naar de 8 GB CF kaart. Bifferboard opstarten en lopen.
Helaas wist om één of andere reden de Bifferboard niet meer dat de audiodevices onder /dev/audio en /dev/dsp thuishoorden. Na enig zoekwerk op het grote WWW
bleek dat modprobe snd-pcm-oss alles weer in orde maakte, tot de volgende reboot. Een andere zoektocht leerde weer dat het bestand /etc/rc.local aan te vullen is met deze regel tekst en dat dan na elke reboot /dev/audio en /dev/dsp weer bestaan.
Ook nog gevonden dat het commando cat /dev/urandom > /dev/audio een hoop lawaai in de speaker produceert om op die manier te bewijzen dat /dev/audio bestaat én ook nog in staat is om lawaai te produceren. Het lawaai is weer stil te krijgen met ctrl-c.![]()
Wil je onder Linux Subsonic draaien en naar een netwerkschijf mappen voor je muziekbestanden dan kan dat met mount -tsmbfs //192.168.xxx.xxx/public/music /mnt/music
in /mnt moet je dan eerst de map music aanmaken. Helaas werkt zo'n mount commando bij mij nooit de eerste keer. Er verschijnt een Password? prompt en wat ik dan ook intik, geen reactie.
Gelukkig is er nog apt-get install smbfs , dit is standaard niet meegeïnstalleerd (onder Ubuntu). Hierna werkt bovenstaand mount commando ineens wel.
Er bestaan ook nog opties om usernaam en password mee te geven, zie Google.
En als dat allemaal niet wil dan is er nog cifs
sudo mount -t cifs //192.168.xxx.xxx/public /mnt/nas -o username=ben,password=test
![]()
Als je onder Linux (Ubuntu) een terminal opent en dan bijvoorbeeld darkice start zit je heel de tijd met een terminalsessie voor je neus. Start je vanuit terminal een screen ( screen -a ) en daarvandaan start je darkice (darkice -c /etc/darkice.cfg ) dan kan je met control a d dit screen detachen, darkice draait dan door maar gewoon op de achtergrond. Start dan een nieuw screen (screen -a) en start daarvandaan bijvoorbeeld webcam, dan kan je ook deze weer detachen met control a d en dan draait ook de webcam op de achtergrond door. Als je dan weer screen -r doet krijg je de melding dat er meerdere screens actief zijn, met een overzicht erbij en de aanwijzing hoe je kan kiezen welke screen je actief maakt. Een actief screen kan je weer detachen met ctrl a d. Voorbeeldje:
zanco@zanco-desktop:/etc$ screen -r
There are several suitable screens on:
8353.pts-0.zanco-desktop (14-11-10 20:13:33) (Detached)
8325.pts-0.zanco-desktop (14-11-10 20:10:30) (Detached)
Type "screen [-d] -r [pid.]tty.host" to resume one of them.
sudo apt-get install screen als het nog niet geinstalleerd is.
nohup is a POSIX command to ignore the HUP (hangup) signal, enabling the command to keep running after the user who issues the command has logged out
dus nohup sh check.sh gestart vanaf een Putty SSH shell naar de rapsberry start rtl_tcp, kijkt elke 5 seconden of hij nog draait en start hem zonodig, en blijft draaien ook als je de Putty SSH shell sluit.
#!/bin/bash
PROCESS="rtl_tcp"
while true;
do
if [ "$(pgrep $PROCESS)" ]
then
echo "process $PROCESS started"
else
echo "process $PROCESS is not running"
rtl_tcp -a 192.168.0.50 -s 2048000
fi
sleep 5
done![]()
rtl_sdr -f 105000000 -s 1000000 -| /home/pe2bz/baudline_1.08_linux_x86_64/baudline -reset -samplerate 1000000 -channels 2 -format u8 -quadrature -stdin
Dit geeft baudline als spectrum analyzer weer met de data die hij uit de rtl-sdr stick krijgt. -f = frequentie en -s = samplerate
![]()
mplayer -vf mirror,framestep=2500 tv:// -tv driver=v4l2:device=/dev/easycap0 -nosound -vo jpeg
Start mplayer vanaf de command line, laat hem elke 2500 frames (ofwel 100 seconden bij 25 fps) een plaatje opslaan in de huidige map. Om meerdere videofilters toe te kunnen passen moeten ze met een komma gescheiden worden. To use -vf more than once, seperate them with a colon ( , ) as in the example above.
udevinfo onder Ubuntu is niet bekend. gebruik hiervoor udevadm. Da's simpel gezegd maar nog niet zo simpel gedaan.
sudo udevadm info -a -p $(udevadm info -q path -n /dev/video1) komt in elk geval een eind in de goede richting..
Als je onder Linux na het booten een verwisseling van USB devices (webcams ofzo) hebt (/dev/video0 en video1 omgewisseld enzo) dan kan je een udev rule maken die aan een fabrikant ID en typenummer een vaste device naam koppelt.
SUBSYSTEM=="video4linux", BUS=="usb", SYSFS=="046d", SYSFS=="0990", NAME="vensterbank" SUBSYSTEM=="video4linux", BUS=="usb", SYSFS=="a088", SYSFS=="0820", NAME="nestkastje" did do the trick. Perhaps all other solutions I tried also would have worked, but this one stated clearly that is was necessary to remove the USB device once and plug it back in to be known with it's new name....![]()
kill -9 pid naam werkt iets sterker dan kill zonder -9 .....
V4l2 eigenschappen van een device: v4l2-ctl -d /dev/vensterbank --all
Of v4l2-ctl -d l --all als de devices nog hun originele /dev/video0 , 1 , 2 nummers hebben
v4l2ucp /dev/vensterbank geeft een control panel van de gekozen camera![]()
pgrep -l '^dd$' geeft PID van proces met naam dd
pgrep -l '^rtl_tcp$' geeft 2075 rtl_tcp
Als onder linux pv is geinstalleerd (monitor progress of data through a pipe) dan kan met dit commando:
sudo pv debian.img |dd of=/dev/sd een voortgangsindicator (progress indicator) worden getoond zodat je ziet hoever dd is met het copieren.
Wat ook goed werkt bij dd:
watch -n 10 kill -USR1 $(pgrep -l '^dd$' | tr -d [:alpha:]) dit geeft elke 10 seconden een indicatie van de voortgang.
![]()
USBVIEW is geen standaard package onder Ubuntu. Versie 1.011 laat zich als deb package installeren onder Ubuntu 10.10. Versie 1.07 geeft meldingen dat er noodzakelijke pakketten niet geinstalleerd zijn, versie 1.011 regelt automatisch wat nodig is. Daarna geeft USBVIEW een foutmelding dat hij geen devices kan vinden. Doe vervolgens:
sudo mount --bind /dev/bus /proc/bus
sudo ln -s /sys/kernel/debug/usb/devices /proc/bus/usb/devices
start vervolgens usbview en je kan per poort zien of het 1.1 of 2.0 is en wat de gebruikte bandbreedte is. 2 maal een 2 Megapixel Webcam zitten samen op 99 procent.
Werkt het dan nog niet dan zou het kunnen dat usbfs niet gemount is. Dit kan in /etc/fstab met de regel
none /proc/bus/usb usbfs defaults waarna mount -a de mounts in /etc/fstab opnieuw mount
![]()
Error creating access file in the /pages directory (insufficient privileges) in Website Baker ?
Meestal veroorzaakt als je een pagina toe wilt voegen en geen parent hebt opgegeven.
(Mostly caused by adding a page and not giving it a parent)
![]() English translation from here
English translation from here ![]()
ls -la /dev/snd
The above command should produce an output similar to the one shown below, provided that you do have a sound card and that ALSA is present and loaded on your system.
total 0
drwxr-xr-x 2 root root 280 Oct 31 13:48 .
drwxr-xr-x 12 root root 3840 Oct 31 13:49 ..
crw------- 1 kamil root 116, 10 Oct 31 13:48 controlC0
crw------- 1 kamil root 116, 13 Oct 31 13:48 controlC1
crw------- 1 kamil root 116, 9 Oct 31 13:48 pcmC0D0c
crw------- 1 kamil root 116, 8 Oct 31 13:48 pcmC0D0p
crw------- 1 kamil root 116, 7 Oct 31 13:48 pcmC0D1c
crw------- 1 kamil root 116, 6 Oct 31 13:48 pcmC0D2c
crw------- 1 kamil root 116, 5 Oct 31 13:48 pcmC0D3c
crw------- 1 kamil root 116, 4 Oct 31 13:48 pcmC0D4p
crw------- 1 kamil root 116, 12 Oct 31 13:48 pcmC1D0c
crw------- 1 kamil root 116, 11 Oct 31 13:48 pcmC1D0p
crw------- 1 kamil root 116, 3 Oct 31 13:48 seq
crw------- 1 kamil root 116, 2 Oct 31 13:48 timer
The above output shows a number of devices. Amongst others, there is the /dev/snd/controlC0 which is the control device for card 0, as well as /dev/snd/pcmC0D0p which is the raw audio playback device 0 on card 0. Note that the current naming convention is such that the card number follows the letter C and device number follows the letter D. The last letter on the pcm devices, c or p, indicates if the device is used for capture or playback, respectively.
Installing alsa-oss
Alsa-oss is installed by getting the package alsa-oss from the Universe software channel. For more information on installing packages, see InstallingSoftware.
Usage
There are two ways of getting an application to work with ALSA if the application was written for OSS. The first way is to load the special ALSA drivers that emulate the OSS kernel interface; these allow the application to open /dev/dsp0 and other OSS device files.
The second way is to wrap the application in the libaoss library provided in this package; the wrapper causes the application to access native ALSA device files such as /dev/snd/pcmC0D0c instead of OSS device files.
Most commonly it is used by starting applications with the "aoss" command, something like this:
aoss /path-to-program/program-executable
Dus aoss darkice /etc/darkice.cfg dan kan darkice wel /dev/dsp gebruiken terwijl anders creatieve namen als /dev/snd/pcmC0D0c gebruikt moeten worden![]()
Het numerieke keypad wilde maar niet werken onder Ubuntu. Diverse instellingen geprobeerd, geen verschil. num lock ging wel aan en uit. Uiteindelijk gaf onderstaand bericht de oplossing:
While testing shift-Num Lock and other combos I noticed that the mouse pointer was moving around a little when I was hitting the keypad keys. That tickled a neuron or two and I started searching and found that "Allow to control the pointer using the keyboard" was checked in "Keyboard Preferences". I unchecked it and that solved the problem!
Thanks for the hints and suggestions, Dennis!
![]()
Controleren of een programma draait en zoniet het weer opstarten: Bijvoorbeeld Darkice:
#!/bin/sh
SERVICE='darkice'
if ps -C darkice > /dev/null
then
echo "$SERVICE service running, everything is fine"
else
echo "$SERVICE is not running"
sudo aoss darkice /etc/darkice.cfg
echo "$SERVICE is not running!" | mail -s "$SERVICE down" root
fi
![]()

( Image courtesy of rafaelbf / afbeelding van rafaelbf )
Voor het loggen van het opstarten van een WM8650 tablet met Angstrom linux had ik een console kabel nodig voor aan de serieële poort van de WM8650. Bij deze (TomTec, Bart Smit 7 inch android 2.2 ) tablet zat een adapter voor 2 USB poorten en een bedrade netwerkaansluiting. Als je deze behuizing opent (2 schroefjes) dan zitten er 4 eilandjes op deze print met de namen gnd, txd, rxd en 3,3 Volt.
Er zwierf nog ergens een Nokia ma-8610c usb programmeerkabel die door linux werd herkend als /dev/ttyUSB0 en na het demonteren van de nokia stekker en wat uitzoek werk bleek dat groen = RX , geel = TX en de afscherming is ground. Deze (gekruist) verbonden met de eilandjes en waarempel, terminal op 115.200 en ttyUSB0 en gaan als de brandweer.
![]()
![]()
![]()
![]()
![]()
![]()
![]()
![]()
Installeer Debian 6.03 met grafische omgeving, Webserver en SSH server
voeg aan /etc/init.d/rc.local aan het einde de regel toe modprobe snd_pcm_oss
Na het opstarten bestaat /dev/dsp dan weer.
![]()
Een debian yaffs2 op de Mini2440 gaf elke keer de foutmelding dpkg failed error (2) en wilde niks installeren. De foutmelding dpkg path not set zou op te lossen moeten zijn met dpkg --configure -a maar gaf dezelfde melding path not set.
Path is wel ingesteld, met export PATH=/usr/local/sbin enzovoort.
Het werkt wel via een omweg, namelijk apt-get install packagename vooraf laten gaan door de complete PATH= regel.
PATH=/usr/local/sbin:/usr/local/bin:/usr/sbin:/usr/bin:/sbin:/bin apt-get install motion (bijvoorbeeld)
Even denken waarom dat zo raar moet maar voorlopig toch een work around
![]()
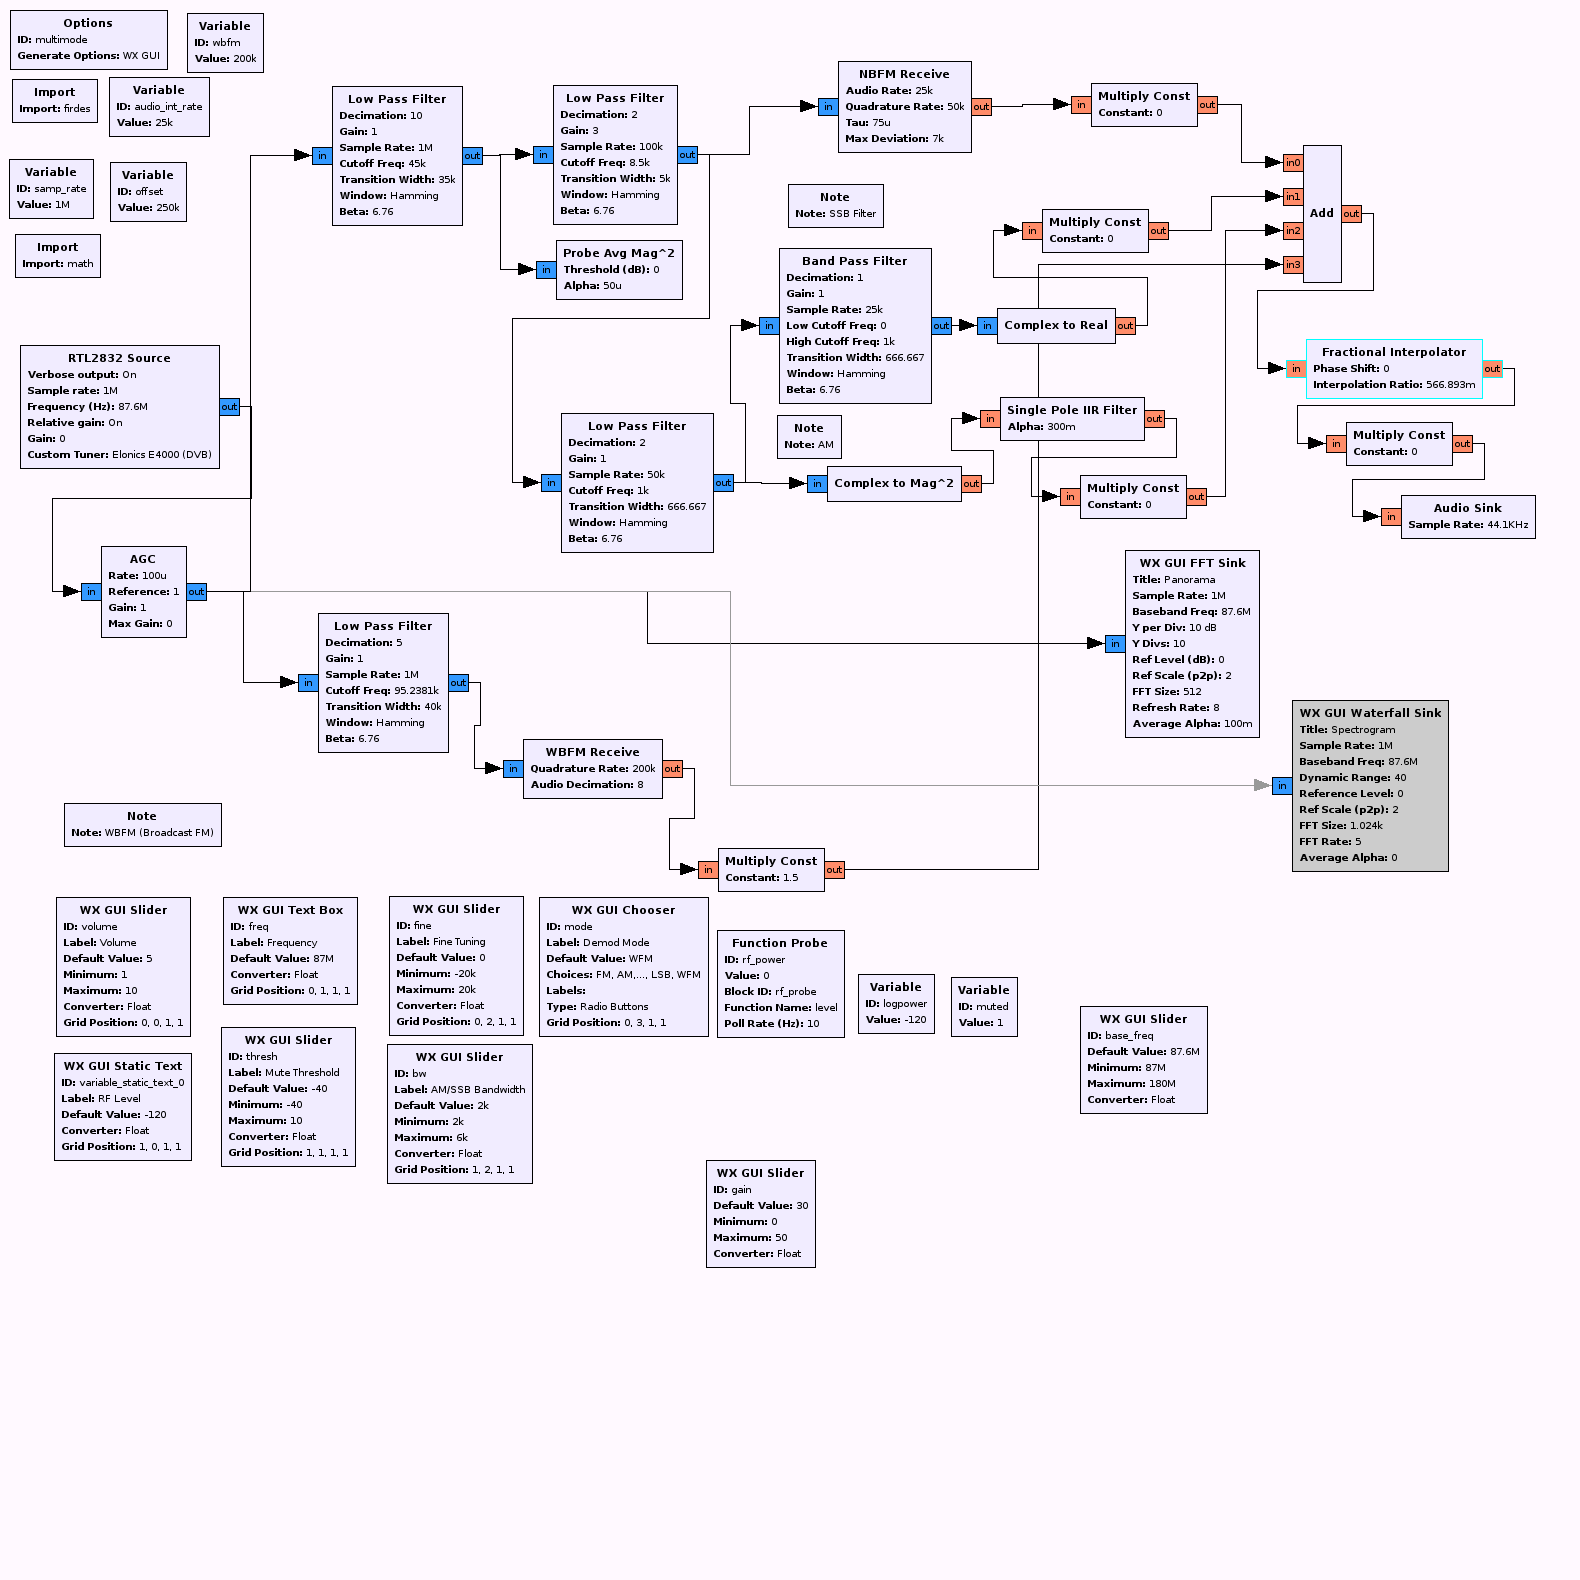
GNU-Radio werkt leuk. Ook met de lowcost SDR met RTL2832u. Op debian, met een duacl core Atom op 1,8 GHz, waarvan 1 core 100% camera software draait wordt het een beetje krap met spectrum en FFT. Dus een HP DC5700 opgedoken, dual core 2,2 GHz met 1 GB geheugen en daar debian op geinstalleerd. Zo geregeld, geen probleem. GNU-Radio geinstalleerd met een handig automatisch script van http://www.sbrac.org/files/build-gnuradio wat op een gegeven moment stopte bij het installeren van portaudio19-dev zonder verdere melding. Ik ook de rotste niet, sudo apt-get install portaudio190-dev en die stopte waarempel ook bij 47 procent. Tenslotte verscheen de melding dat ik de debian 6.04 iso CD er in moest doen. Toen toch maar eerst in /apt/sources.list de Debian installatie CD eruit gegooid. Daarna de script weer gedraaid en toen lukte het volledig.
Toch deed GNU-Radio een beetje lelijk omdat ik geen audio device zou hebben. Ook Debian vond dat ik er geen een had. LSPCI toonde aan dat er een Nvidia audio on board was gevonden maar bij de mixer instellingen beweerde Debian dat er geen audio hardware was. Na veel vijven en zessen maar eens in de bios gekeken en daar stond gewoon de onboard audio uitgeschakeld.
En waarempel, toen was er ineens geluid.
Wel viel het me op dat er (net als op de dual core Atom) een verschil in weergave van het geluid zat met het originele geluid. De tonen waren allemaal wat lager dus de presentatoren klonken wat rustig alsook de muziek.
De Audio sink stond ingesteld op een sample rate van 48 kHz. GNU-Radio gaf een melding dat mijn geluidskaart 44,1 kHz wilde dus heb ik de waarde van de audio sink op 44,1 kHz gezet en toen bleef de foutmelding weg. Het geluid bleef wel langzaam dus nog even verder gezocht. Er blijkt een blok gebruikt te worden met de naam fractional interpolator, waar een parameter inzat met ook de waarde 48 kHz. Nadat ik deze ook had aangepast naar 44,1 kHz was het geluid ineens goed.
darkice
Using / etc / darkice.cfg
input device / dev / dsp
icecast2-b-c / etc/icecast2/icecast.xml
/ Logs / error.log
/ Logs / access / log
as root: chmod 777 logs
darkice can not open connector means to me Just get it wrong (a non-existent) audio device you specified.
ls / dev / dsp * and ls / dev / audio *
lighttpd.conf the port number and the root directory to / var / www
cd / etc / default nano icecast2 init.d activate or enable him / etc/init.d/icecast2 back to start
apt-get package manager = bifferboard
apt-get upgrade does upgrade installed packages.
apt-cache search name search or a package is available for apt-get install
dpkg-l will list installed packages
To see if a package is installed: dpkg-l | grep Package
= peak processor load from command line
df = disk free with list of mounted devices and their size
sudo nautilus in Ubuntu open file as root. You will need to automate the rootfs on a USB stick may write
apt-get install libhamlib2 for rigctl and then the libhamlib-utils
Network configuration by means of Debian Lenny the interfaces file in / etc / network,
network restart with / etc / init.d / networking restart
# The loopback network interface
auto lo
iface lo inet loopback
# For DHCP address
# Auto eth0
# Iface eth0 inet dhcp
# For fixed IP address
auto eth0
allow-hotplug eth0
iface eth0 inet static
address 192.168.0.XX
netmask 255.255.0.0
broadcast 192.168.0.255
gateway 192.168.0.1
dns-domain lan
dns-nameservers 192.168.0.1
apt-get install libhamlib2
apt-get install-utils libhamlib
apt-get install samba
apt-get install lighttpd
var / www / cgi-bin is a link to / usr / lib / cgi-bin
In / etc / lighttpd / lighttpd.conf for server modules "mod-cgi" add
and tell what happened to cgi or perl files must be done under
# # # # Handle Debian Policy Manual, Section 11.5. urls
# # By default allow them only from localhost
cgi.assign = (". pl" => "/ usr / bin / perl"
. "Cgi" => "/ usr / bin / perl")
lighttpd restart with / etc / init.d / lighttpd restart
Through the web server to write data to the RS-232 / USB converter:
create a file named / etc / udev / rules.d / rig.rules with the following content:
KERNEL == "ttyUSB0", GROUP = "dialout", MODE = "666"
After that ttyUSB0 is the correct legal institution should know:
bifferboard: ~ # ls-l / dev/ttyUSB0
crw-rw-rw-1 root dialout 188, 0 7/8/2009 4:03 / dev/ttyUSB0
Samba configuration:
# # # # Networking # # # #
# The specific set of interfaces / networks to bind to
# This can be either the interface name or an IP address / netmask;
# Interface names are normally preferred
interfaces = 127.0.0.0 / 8 eth0
# ======================= Share Definitions =======================
[Homes]
comment = Home Directories
browseable = yes
# By default, the home directories are Exported read-only. Change the
# Next parameter to 'no' if you want to be bootable to write to them.
read only = no
# File creation mask is set to 0700 for security Reasons. If you want to
# Create files with group = rw permissions, set next parameter to 0775.
create mask = 0770
# Directory creation mask is set to 0700 for security Reasons. If you want to
# Create dirs. with group = rw permissions, set next parameter to 0775.
directory mask = 0770
# By default, \ \ server \ username shares can be connected to by anyone
# With access to the samba server.
# The following parameter makes sure That only "username" can connect
# To \ \ server \ username
# This might need tweaking When Using external authentication schemes
valid users = root
[Allfiles]
path = /
browseable = yes
writeable = yes
valid users = root
admin users = root
Simple smb.conf that allows anonymous access and write permissions (use at your own risk!)
interfaces = lo eth0
bind interfaces only = true
security = share
guest account = nobody
[Allfiles]
path = /
browseable = yes
read only = no
force user = root
guest ok = yes
And then I replaced the stick with a USB to IDE cable with it a 1.8 Inch IDE to CF adapter containing an 8 GB CF card.
All files in the rootfs of the SUB stick under linux copied to a folder and from there to the 8 GB CF card. Bifferboard boot and run.
Unfortunately knew for some reason the Bifferboard not that the audio devices under / dev / audio and / dev / dsp belonged. After some searching on the big WWW
showed that modprobe snd-pcm-oss made everything right again, until the next reboot. Another quest learned again that the file / etc / rc.local to supplement with this line of text and that after each reboot / dev / audio and / dev / dsp again exist.
I also found that the command cat / dev / urandom> / dev / audio a lot of noise in the speaker produces in order to get to prove that / dev / audio and is also capable of producing noise. The noise is still to get back with ctrl-c.
Would you like Subsonic running under Linux and to a network folder for your music files that you can mount tsmbfs / / 192.168.xxx.xxx/public/music / mnt / music
in / mnt, you must first create the music folder. Unfortunately, such a mount command with me the first time ever. A Password? prompt and what I intik therefore, no response.
Fortunately, there is apt-get install smbfs, this standard is not automatically installed (on Ubuntu). Then suddenly it works above mount command.
There are also options for user name and password to give, see Google.
If you are under Linux (Ubuntu) open a terminal and then start darkice example you sit all the time with a terminal session in front of you. Start your terminal from a screen (a screen) and from there you start darkice (darkice-c / etc / darkice.cfg) you can control with this ad detachen screen, darkice than just running in the background. Start a new screen (a screen) and start from there for example webcam, you can again use detachen with control ad and then turns the webcam on the background. If you then screen-r do you get the message that multiple screens are active, with a survey there and the clue how you can choose which screen you are active. An active screen you can again detachen ctrl a d. Example:
zanco zanco @ desktop :/ etc $ screen-r
There are Several Suitable screens on:
8353.pts-0.zanco desktop (14-11-10 20:13:33) (Detached)
8325.pts-0.zanco desktop (14-11-10 20:10:30) (Detached)
Type "screen [-d]-r [pid.] Tty.host" to resume one of them.
sudo apt-get install screen if it is not installed.
mplayer-vf mirror, frame step = 2500 tv :/ /-tv driver = v4l2: device = / dev/easycap0-nosound-vo jpeg
Start mplayer from the command line, let him every 2500 frames (or 100 seconds at 25 fps) an image saved in the current directory. For more video filters should be able to apply them with a comma separated. To use-vf more than once, separate them with a colon (,) as in the example above.
udevinfo under Ubuntu is not known. use this udevadm. That's easily said but not so easily done.
sudo udevadm info-a-p $ (udevadm info-q path-n / dev/video1) is at least a step in the right direction ..
If you boot Linux after a swap of USB devices (webcams or something) have (/ dev/video0 and video1 exchanged etc.) then you can make a udev rule to create a manufacturer ID and type a fixed device name link.
SUBSYSTEM == "video4linux", BUS == "usb", sysfs == "046d" sysfs == "0990", NAME = "window" SUBSYSTEM == "video4linux", BUS == " usb "sysfs ==" a088 "sysfs ==" 0820 ", NAME =" birdhouse "did do the trick. Perhaps Also I tried all other solutions would have worked, but this one was Stated Clearly That is Necessary to remove the USB device and plug it back in once to be known with it's new name ....
kill -9 pid name is a little bit stronger than kill -9 without .....
Properties of a device v4l2: v4l2-ctl-d / dev / sill - all
Or dl-v4l2-ctl - all the devices retain their original / dev/video0, 1, 2 numbers
v4l2ucp / dev / window displays a control panel of the selected camera
USBView is no standard package under Ubuntu. Version 1011 can be installed as a deb package on Ubuntu 10.10. Version 1.07 provides alerts that necessary packages are not installed, version 1011 automatically controls what is needed.Then USBView gives an error that he can find no devices. Then do:
sudo mount - bind / dev / bus / proc / bus
sudo ln-s / sys / kernel / debug / usb / devices / proc / bus / usb / devices
USBView then start and you can see if the per-port 1.1 or 2.0 and what is the bandwidth used. 2 times a 2 Megapixel Webcam sitting together at 99 percent.
ls-la / dev / snd
The above command Should produce an output similar to the one Shown below, provided That you do have a sound card and ALSA That is present and loaded on your system.
total 0
drwxr-xr-x 2 root root 280 Oct 31 13:48.
drwxr-xr-x 12 root root 3840 Oct 31 1:49 p.m. ..
kamil crw ------- 1 root 116, 10 Oct 31 1:48 p.m. controlC0
kamil crw ------- 1 root 116, 13 Oct 31 1:48 p.m. controlC1
kamil crw ------- 1 root 116, 9 Oct 31 1:48 p.m. pcmC0D0c
kamil crw ------- 1 root 116, 8 Oct 31 1:48 p.m. pcmC0D0p
kamil crw ------- 1 root 116, 7 Oct 31 1:48 p.m. pcmC0D1c
kamil crw ------- 1 root 116, 6 Oct 31 1:48 p.m. pcmC0D2c
crw kamil ------- 1 root 116, 5 Oct 31 1:48 p.m. pcmC0D3c
kamil crw ------- 1 root 116, 4 Oct 31 1:48 p.m. pcmC0D4p
kamil crw ------- 1 root 116, 12 Oct 31 1:48 p.m. pcmC1D0c
kamil crw ------- 1 root 116, 11 Oct 31 1:48 p.m. pcmC1D0p
kamil crw ------- 1 root 116, 3 Oct 31 1:48 p.m. seq
kamil crw ------- 1 root 116, 2 Oct 31 1:48 p.m. timer
The above output shows a number of devices. Amongst others, there is the / dev/snd/controlC0 which is the control device for card 0, as well as / dev/snd/pcmC0D0p which is the raw audio playback device 0 on card 0. Note That the current naming convention is Such That the card number follows the letter C and device number follows the letter D. The last letter on the PCM devices, c or p, indicates if the device is overused for capture or playback, respectively.
Installing alsa-oss
Alsa-oss is installed by getting the alsa-oss package from the Universe software channel. For more information on installing packages, see InstallingSoftware.
Usage
There are two ways of getting an application to work with ALSA if the application was written for OSS. The first way is to load the special ALSA drivers That Emulate the OSS kernel interface; thesis allow the application to open / dev/dsp0 and other OSS device files.
The second way is to wrap the application in the libaoss library provided in this package, the wrapper causes the application to access native ALSA device files Such As / dev/snd/pcmC0D0c INSTEAD OF OSS device files.
Most Commonly it is overused by applications starting with the "AOSS" command, something like this:
AOSS / path-to-program/program-executable
So AOSS darkice / etc / darkice.cfg can darkice or / dev / dsp use while other creative names like / dev/snd/pcmC0D0c be used
The numeric keypad just would not work under Ubuntu. Various institutions have tried, no difference. num lock on and off it went. Ultimately, the solution gave the following message:
While testing Shift Num Lock and other combos I noticed That the mouse pointer was moving around a little when i was hitting the keypad keys. That tickled a neuron or two and I started searching and found that "Allow to control the pointer Using the keyboard" was checked in "Keyboard Preferences". I unchecked it and That solved the problem!
Thanks for the hints and suggestions, Dennis!
Check if a program is running and if not a restart: darkice example:
#! / Bin / sh
SERVICE = 'darkice'
if ps-C darkice> / dev / null
then
echo "$ SERVICE service running, everything is fine"
else
echo "$ SERVICE is not running '
AOSS darkice sudo / etc / darkice.cfg
echo "$ SERVICE is not running!" | Mail-s "$ SERVICE down" root
fi
Install Ubuntu 6.03 with graphical environment, web server and SSH server
add in / etc / init.d / rc.local at the end of the line to modprobe snd_pcm_oss
After startup is / dev / dsp then.
A debian yaffs2 the Mini2440 gave each time the error dpkg failed error (2) and wanted to install anything. The error path not set dpkg would have to solve with dpkg - configure-a but did not set the same message path.
Path is set, with export PATH = / usr / local / sbin and so on.
It works via a detour, because apt-get install packagename precede the complete PATH = line.
PATH = / usr / local / sbin :/ usr / local / bin :/ usr / sbin :/ usr / bin :/ sbin :/ bin apt-get install motion (for example)
Just think why it should be silly but still a temporary workaround
GNU Radio works great. Even with low-cost SDR with RTL2832u. On debian, with duacl core Atom at 1.8 GHz, 1 core 100% camera, the software runs a little tight and FFT spectrum. So an HP dc5700 surfaced, dual core 2.2 GHz with 1 GB memory and installed it on debian. So regularly, no problem. GNU Radio installed automatically with a handy script http://www.sbrac.org/files/build-gnuradio what at one point stopped at installing portaudio19-dev without further notice. I also adopting the worst is not, sudo apt-get install portaudio190-dev and stopped where Empel even at 47 percent. Finally appeared the message that I debian 6.04 iso CD in to do. When yet but first in / apt / sources.list Debian installation CD thrown out. Then run the script again and then failed completely.
But GNU Radio did a bit ugly because I would have no audio device. Debian also found that I had no one. Lspci showed that there was a Nvidia audio on board was found but the mixer settings Debian claimed that there was no audio hardware.After lots of fives and sixes, but once in the bios looked and there was just the onboard audio disabled.
And where Empel, when there was a sudden sound.
Well I noticed that (like the dual core Atom) a difference in sound reproduction was with the original sound. The tones were a bit lower so the presenters and the music sounded quiet.
Previous page: PHA-1 als breedband versterker
Volgende pagina: Deel 2